
チュートリアルをやらない人は8:railsのデーターベースをmariadbにする に進んでください。
https://railstutorial.jp/chapters/beginning?version=7.0#cha-beginningを参考にして行っていく。はじめにこのチュートリアルと違うのは
1:IDE(cloud9)で無く、ローカルのサブホストで行っている
2:rubyとrailsが違っている。ruby 3.1.2 → 3.2.2, rails 7.0.4 → 7.0.6
3:一人でやっているのでgithubは使わない
4:ディプロイをしないので render は使わない
で早速、時間がかかるのでRubyドキュメントをスキップする設定
$ echo “gem: –no-document” >> ~/.gemrc
bundlerのバージョンを指定してインストールする
$ gem install bundler -v 2.3.14
私はrailsのデーターは独立した領域を割り当てていて、そこに保存するようにしている。
$ sudo mkdir /ライリスを保存するディレクトリ
$ sudo chown -R ユーザー名. /ライリスを保存するディレクトリ
$ cd /ライリスを保存するディレクトリ
$ mkdir environment ← 開発用ディレクトリーを作る
$ cd environment
バージョンの優先順位は高い方から rbenv shell, rbenv local, rbenv global の順になっている。前にグローバルを設定しているがlocalも設定しておく
$ rbenv local 3.2.2
テストプログラム hello_app を作る
$ rails _7.0.6_ new hello_app –skip-bundle
色々インストールされる。次はGemfileの編集
$ cd hello_app
$ gedit Gemfile
source “https://rubygems.org”
git_source(:github) { |repo| “https://github.com/#{repo}.git” }
ruby “3.2.2”
gem “rails”, “7.0.6”
gem “sprockets-rails”, “3.4.2”
gem “importmap-rails”, “1.1.0”
gem “turbo-rails”, “1.1.1”
gem “stimulus-rails”, “1.0.4”
gem “jbuilder”, “2.11.5”
gem “puma”, “5.6.4”
gem “bootsnap”, “1.12.0”, require: false
gem “sqlite3”, “1.4.2”
group :development, :test do
gem “debug”, “1.5.0”, platforms: %i[ mri mingw x64_mingw ]
end
group :development do
gem “web-console”, “4.2.0”
end
group :test do
gem “capybara”, “3.37.1”
gem “selenium-webdriver”, “4.2.0”
gem “webdrivers”, “5.0.0”
end
rubyとrailsのバージョンがチュートリアルとは違う
gemをインストールし、ロックしておく
$ bundle _2.3.14_ install
$ bundle _2.3.14_ lock –add-platform x86_64-linux
次にターミナルを追加し、railsをインストールすると追加されているWEBサーバーを起動する(追加したターミナルでの作業)
$ cd /ライリスを保存するディレクトリ/environment/hello_app
$ bundle install –gemfile /ライリスを保存するディレクトリ/environment/hello_app/Gemfile
あれーエラーが出ている
An error occurred while installing sqlite3 (1.4.2), and Bundler cannot continue.
これはsqlite-develを入れればいいみたい
$ sudo dnf install sqlite-devel ←この時yum.repo.dのalmalinux-crb.repoのenabled=が1になっていること
再度
$ bundle install –gemfile /ライリスを保存するディレクトリ/environment/hello_app/Gemfile
$ rails server
=> Booting Puma
=> Rails 7.0.6 application starting in development
=> Run `bin/rails server –help` for more startup options
Puma starting in single mode…
* Puma version: 5.6.4 (ruby 3.2.2-p53) (“Birdie’s Version”)
* Min threads: 5
* Max threads: 5
* Environment: development
* PID: 42058
* Listening on http://127.0.0.1:3000
* Listening on http://[::1]:3000
Use Ctrl-C to stop
そして、ブラウザのURL欄にlocahost:3000
と入力したら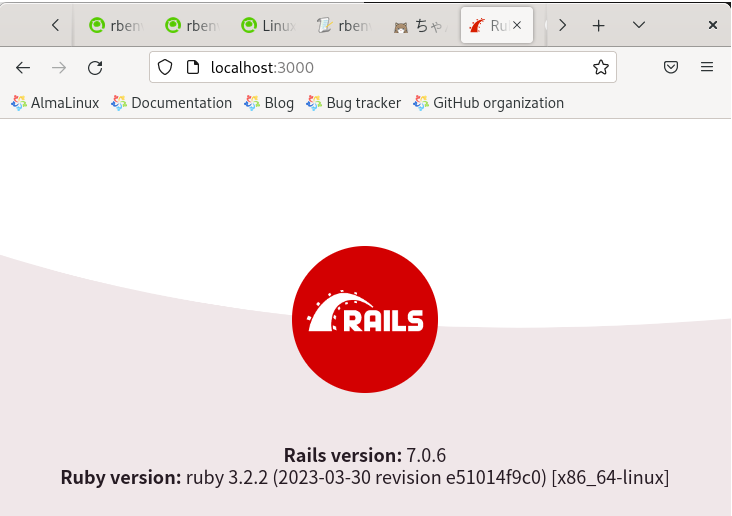 と表示された
元のターミナルに戻って、アクションを追加します。
$ gedit app/controllers/application_controller.rb
class ApplicationController < ActionController::Base
def hello ← ここから3行を追記
render html: “hello, world”
end
end
次にルートを設定
$ gedit config/routes.rb
Rails.application.routes.draw do
root “application#hello”
end
そして、ブラウザに戻って、再読み込みをすると
hello, worldが表示される
元のターミナルの戻り、gitのセットアップ
gitのバージョンを確認
$ git –version
git version 2.39.3
次に名前とemailの設定
$ git config –global user.name kk-otake
$ git config –global user.email メアド
確認は git config user.name などで出来る。次は、Gitのデフォルトブランチ名の設定です
$ git config –global init.defaultBranch main
エイリアスを設定して置くと便利なので、git sをstatusのエイリアスに設定する
$ git config –global alias.s status
コマンドを入力するたびにパスワードを入力しなくて済むように認証情報をキャッシュする。
$ git config –global credential.helper “cache –timeout=86400”
これで1日に設定された。
新しいリポジトリの初期化
$ git init
Reinitialized existing Git repository in /Rails/environment/hello_app/.git/
全ファイルをリポジトリに追加
$ git add -A
gitのステイタスを見てみる
$ git s
On branch main
No commits yet
Changes to be committed:
(use “git rm –cached <file>…” to unstage)
new file: .gitattributes
new file: .gitignore
new file: .ruby-version
後略
リポジトリに保存(コミット)する
$ git commit -m “Initialize repository” ← -mはコメント
[main (root-commit) a6e33ca] Initialize repository
70 files changed, 1170 insertions(+)
create mode 100644 .gitattributes
create mode 100644 .gitignore
後略
ログを見てみる
$ git log
commit a6e33cab770514bc9f373bd962102bab8f4663d3 (HEAD -> main)
Author: f-otake <otake@inpac.jp>
Date: Thu Aug 10 09:23:22 2023 +0900
Initialize repositor
Gitのブランチ(Branch)
$ git switch -c modify-README
Switched to a new branch ‘modify-README’
$ git branch
main
* modify-README
*がついている所が使用中のブランチ
Gitの編集(Edit)
練習の為README.mdを編集
$ gedit README.md
# Ruby on Rails Tutorial
## “hello, world!”
This is the first application for the
[*Ruby on Rails Tutorial*](https://railstutorial.jp/)
by [Michael Hartl](https://www.michaelhartl.com/). Hello, world!
そして保存後、確認
$ git status
On branch modify-README
Changes not staged for commit:
(use “git add <file>…” to update what will be committed)
(use “git restore <file>…” to discard changes in working directory)
modified: README.md
no changes added to commit (use “git add” and/or “git commit -a”)
でもって、コミット(オプション-aはすべての変更ファイル(git mvで作成したファイルも含む)をまとめてコミット)
$ git commit -a -m “Improve the README file”
[modify-README ca00142] Improve the README file
1 file changed, 5 insertions(+), 22 deletions(-)
Gitのマージ(Merge)
$ git switch main
Switched to branch ‘main’
$ git merge modify-README
Updating a6e33ca..ca00142
Fast-forward
README.md | 27 +++++———————-
1 file changed, 5 insertions(+), 22 deletions(-)
変更をマージした後は、git branch -dを実行してトピックブランチを削除
$ git branch -d modify-README
Deleted branch modify-README (was ca00142).