
デフォルトではひらがなモードで起動され、コマンドを打つ時いちいち英数モードにするのが面倒。どうやったらデフォルトで英数モードになるかわからなかったが、
アプリケーション → システムツール → 設定をクリック、開いたウィンドウで”地域と言語”をクリック、入力ソースにある”日本語(かな漢字)をクリックすると、その下に歯車アイコンが表示されるので、それをクリックし、さらに開いたウィンドウの動作タブをクリックし、”初期入力モード”を英数にする。
これで起動時には英数モードになっている。
デフォルトではひらがなモードで起動され、コマンドを打つ時いちいち英数モードにするのが面倒。どうやったらデフォルトで英数モードになるかわからなかったが、
アプリケーション → システムツール → 設定をクリック、開いたウィンドウで”地域と言語”をクリック、入力ソースにある”日本語(かな漢字)をクリックすると、その下に歯車アイコンが表示されるので、それをクリックし、さらに開いたウィンドウの動作タブをクリックし、”初期入力モード”を英数にする。
これで起動時には英数モードになっている。
エラーは
Deprecated: Function create_function() is deprecated in /XXXXXXX/wp-content/plugins/biz-calendar/biz-calendar.php on line 73
早速/wp-content/plugins/biz-calendar/biz-calendar.php を編集する
add_action( ‘widgets_init’, create_function( ”, ‘register_widget( “bizcalendarwidget” );’ ) );
↓ 73行目
add_action( ‘widgets_init’, function(){register_widget( “bizcalendarwidget” );});
これでエラーは出ない
エラーは
Deprecated: Methods with the same name as their class will not be constructors in a future version of PHP; Jetpack has a deprecated constructor in /XXXXXXXX/wp-content/plugins/slimjetpack/class.jetpack.php on line 25
Deprecated: Methods with the same name as their class will not be constructors in a future version of PHP; Jetpack_User_Agent_Info has a deprecated constructor in /XXXXXXXXX/wp-content/plugins/slimjetpack/class.jetpack-user-agent.php on line 61
Warning: “continue” targeting switch is equivalent to “break”. Did you mean to use “continue 2”? in /XXXXXXXXXXX/wp-content/plugins/slimjetpack/modules/infinite-scroll/infinity.php on line 147
Deprecated: Methods with the same name as their class will not be constructors in a future version of PHP; Sharing_Service_Total has a deprecated constructor in /XXXXXXXX/wp-content/plugins/slimjetpack/modules/sharedaddy/sharing-service.php on line 352
Deprecated: Methods with the same name as their class will not be constructors in a future version of PHP; Sharing_Post_Total has a deprecated constructor in /XXXXXXXX/wp-content/plugins/slimjetpack/modules/sharedaddy/sharing-service.php on line 374
と5箇所もエラーになった。先ずは上から1番目、/wp-content/plugins/slimjetpack/modules/sharedaddy/sharing-service.php on line 352 は
/** private function Jetpack() { */ ←コメントアウト これは220行目だった
private function __construct() { ←挿入
上から2番目、/wp-content/plugins/slimjetpack/class.jetpack-user-agent.php on line 61は
/**function Jetpack_User_Agent_Info() ←コメントアウト これは99行目
{ */
function __construct() { ←挿入
上から3番目、/wp-content/plugins/slimjetpack/modules/infinite-scroll/infinity.php on line 147は
continue; → continue 2;
break; → //break;
上から4番目と5番目は、/wp-content/plugins/slimjetpack/modules/sharedaddy/sharing-service.php on line 352 と line 374 は
//public function Sharing_Service_Total( $id, $total ) { ← コメントアウト
public function __construct( $id, $total ) { ← 挿入
//public function Sharing_Post_Total( $id, $total ) { ← コメントアウト
public function __construct( $id, $total ) { ← 挿入
これでエラーは出なくなった。
エラーはダッシュボードにアクセスする時だけ下記のエラーが出る
Notice: add_submenu_page が誤って呼び出されました。add_submenu_page() に渡される第7引数はメニュー位置を示す整数値である必要があります。 詳しくは WordPress のデバッグをご覧ください。 (このメッセージはバージョン 5.3.0 で追加されました) in /webdata/public/kinryo/wp-includes/functions.php on line 4903
となっているので、いろいろ調べたが私の能力では直せなかったので、強引にこの行をコメントアウトしたら、エラーは無くなった。これはサブメニューに関する記述なので、ダッシュボードの各サブメニューを表示したが特に問題は無かったので良しとしている。どなたかちゃんと直せる方がいましたら教えて下さい。
前に使用していたfaviconを変更しようとし、その設定をgoogle先生に聞くと、テーマのheader.phpに設定する方法と、プラグインを使う方法で設定があるとあったが、使用中のheader.phpにfavicon.icoは無いし、ファビコンのプラグインも入れていない。
一体どこにあるのだと、途方に暮れたが、幸いWEBのコンテンツは自分のWEBサーバーにあるので、検索をかけると色々なfavicon.icoが出てきて、その内の一つが使用中のものでした。
私のWEBの構成は下記の様にドメインの下に各国のフォルダーを作りそこにwordpressをインストールしています。(ドメインは inpac.jpでこれは/xxxxx/public/inpacに設定)
/xxxxx/public/inpac/maldives
/xxxxx/public/inpac/india
/xxxxx/public/inpac/srilanka
見たいになっており、このinpacディレクトリーにfavicon.icoがあった。これが表示されていたようでした。これを削除するとファビコンは表示されなくなりました。このWEBはapacheを使用していますが、apacheの仕様がそうなっているのかな?
ある時 、新しいボリュームを新規に作るdirectory にマウントする為に /etc/fstab を修正し、mount -a でなく再起動した。その際うっかり新しいdirectoryを作るのを忘れていたら、何と無いdirectoryをデフフォルトのアクセス権で自動的に作ってくれた!!(centOS 6 ではヱラーになる)
mysql は Ver 14.14 Distrib 5.6.43 ですが、5.5 でも起きるみたいです。https://bugzilla.redhat.com/show_bug.cgi?id=724894 の Here is the patch found on the bacula mantis: に回答がありました。只、私の make_mysql_tables スクリプトは 322行目ではなく、325行目でしたので、@@ -322,12 +322,12 @@ の部分は @@ -325,12 +325,12 @@ になります。その訂正した分のパッチは
-- make_mysql_tables.orig 2010-02-15 16:05:14.000000000 +0200
+++ make_mysql_tables 2010-02-15 16:09:50.000000000 +0200
@@ -325,12 +325,12 @@

-CREATE TABLE Counters (
-   Counter TINYBLOB NOT NULL,
-   MinValue INTEGER DEFAULT 0,
-   MaxValue INTEGER DEFAULT 0,
-   CurrentValue INTEGER DEFAULT 0,
-   WrapCounter TINYBLOB NOT NULL,
+CREATE TABLE \`Counters\` (
+   \`Counter\` TINYBLOB NOT NULL,
+   \`MinValue\` INTEGER DEFAULT 0,
+   \`MaxValue\` INTEGER DEFAULT 0,
+   \`CurrentValue\` INTEGER DEFAULT 0,
+   \`WrapCounter\` TINYBLOB NOT NULL,
    PRIMARY KEY (Counter(128))
    );
現在は11:Sophosアンチウィルスを使用しています。
Clam AntiVirusインストール 参考:https://centossrv.com/clamav.shtml
# yum -y install clamav clamav-server clamav-server-systemd clamav-update clamav-scanner
ウイルス定義ファイル更新設定ファイル編集
# gedit /etc/freshclam.conf
で、Exampleはコメントアウトしてあった(# Exanple)
NotifyClamd /etc/clamd.d/scan.conf ← 追加(ウイルス定義ファイル更新をclamdに通知する)
保存後、/etc/sysconfig/freshclam を編集するが
#FRESHCLAM_DELAY= ← 既に、行頭に#を追加してあった
で、ウイルス定義ファイル最新化をする
# freshclam
あれー、エラーが出た。
ERROR: Please edit the example config file /etc/clamd.d/scan.conf
ERROR: NotifyClamd: Can't find or parse configuration file /etc/clamd.d/scan.conf
/etc/clamd.d/scan.confを編集しろとある
このファイルの8行目位にある Exampleの前に # を着けコメントアウトし、保存後再度
# freshclam
今度は無事終了した。
schkrootkitのインストール
# wget ftp://ftp.pangeia.com.br/pub/seg/pac/chkrootkit.tar.gz
chkrootkit.tar.gzを展開する
# tar zxvf chkrootkit.tar.gz
実行ファイルを/binに移動する
# mkdir -p ~/bin && mv chkrootkit-0.50/chkrootkit ~/bin
ダウンロードしたファイルと展開先ディレクトリーを削除
# rm -f chkrootkit.tar.gz
# rm -rf chkrootkit-0.50
chkrootkitの実行
# chkrootkit | grep INFECTED
変なファイルが無ければ、何も表示されないが
Searching for Linux.Xor.DDoS … INFECTED: Possible Malicious Linux.Xor.DDoS installed
と表示された!!
私の先生のcentossrv.comの質問掲示板にも同様の書き込みがhttps://centossrv.com/patio/centossrv.cgi?read=3066
ここを見ると、どうも誤検知みたいだ。
# find /tmp -executable -type f
/tmp/ks-script-DuXVBx と表示された。
このks-script-DuXVBxの実行権限を外して、再度
# chkrootkit | grep INFECTED
では何も表示されなかった。
毎日chkrootkitを動かすスクリプトを作る
# gedit /etc/cron.daily/chkrootkit
#!/bin/sh
PATH=/usr/bin:/bin:/root/bin
LOG=/tmp/$(basename ${0})
# chkrootkit実行
chkrootkit > $LOG 2>&1
# ログ出力
cat $LOG | logger -t $(basename ${0})
# SMTPSのbindshell誤検知対応
if [ ! -z "$(grep 465 $LOG)" ] && \
[ -z $(/usr/sbin/lsof -i:465|grep bindshell) ]; then
sed -i '/465/d' $LOG
fi
# upstartパッケージ更新時のSuckit誤検知対応
if [ ! -z "$(grep Suckit $LOG)" ] && \
[ -z "$(rpm -Vrpm -qf /sbin/init)" ]; then
sed -i '/Suckit/d' $LOG
fi
# rootkit検知時のみroot宛メール送信
[ ! -z "$(grep INFECTED $LOG)" ] && \
grep INFECTED $LOG | mail -s "chkrootkit report inhostname" root
これで万が一 rootkitがインストールされ場合はメールが来る。
この後、https://centossrv.com/chkrootkit.shtml
を参考にコマンド群の退避を行っておく。
ここはhttp://centossrv.com/tripwire.shtml
の受け売りで
# yum -y install tripwire ← tripwireインストール
# tripwire-setup-keyfiles ← tripwire初期設定
設定するためにサイトパスフレーズを2回聞かれ、ローカルパスフレーズも2回聞いてきます。さらにサイトパスフレーズを2回聞いてきます。のでサイトパスフレーズとローカルパスフレーズを控えておきます。ここもhttp://centossrv.com/tripwire.shtm
を参考にしています。Tripwire設定 をしていきます。
# gedit /etc/tripwire/twcfg.txt
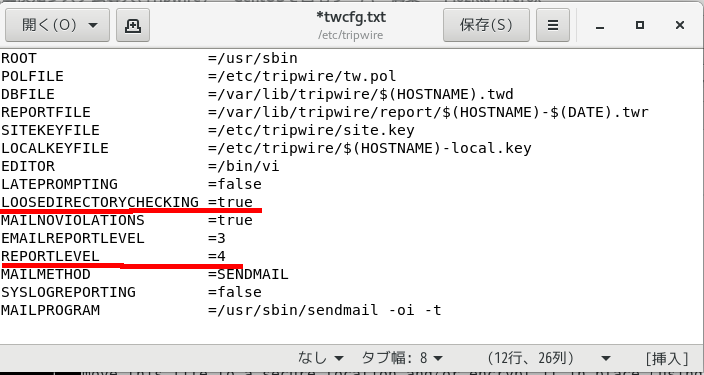
上の図のように2ヶ所変更し保存
# twadmin -m F -c /etc/tripwire/tw.cfg -S /etc/tripwire/site.key /etc/tripwire/twcfg.txt ← Tripwire設定ファイル(暗号署名版)作成
サイトパスフレーズを聞かれます。そして.txtファイルを削除しておく
# rm -f /etc/tripwire/twcfg.txt ← Tripwire設定ファイル(テキスト版)削除
※Tripwire設定ファイル(テキスト版)を復元する場合
# twadmin -m f -c /etc/tripwire/tw.cfg > /etc/tripwire/twcfg.txt
# gedit /etc/tripwire/twpolmake.pl
#!/usr/bin/perl
# Tripwire Policy File customize tool
# ----------------------------------------------------------------
# Copyright (C) 2003 Hiroaki Izumi
# This program is free software; you can redistribute it and/or
# modify it under the terms of the GNU General Public License
# as published by the Free Software Foundation; either version 2
# of the License, or (at your option) any later version.
# This program is distributed in the hope that it will be useful,
# but WITHOUT ANY WARRANTY; without even the implied warranty of
# MERCHANTABILITY or FITNESS FOR A PARTICULAR PURPOSE.  See the
# GNU General Public License for more details.
# You should have received a copy of the GNU General Public License
# along with this program; if not, write to the Free Software
# Foundation, Inc., 59 Temple Place - Suite 330, Boston, MA  02111-1307, USA.
# ----------------------------------------------------------------
# Usage:
#    perl twpolmake.pl {Pol file}
# ----------------------------------------------------------------
#
$POLFILE=$ARGV[0];
open(POL,"$POLFILE") or die "open error: $POLFILE" ;
my($myhost,$thost) ;
my($sharp,$tpath,$cond) ;
my($INRULE) = 0 ;
while (<POL>) {     chomp;
    if (($thost) = /^HOSTNAME\s*=\s*(.*)\s*;/) {
         $myhost = `hostname` ; chomp($myhost) ;
         if ($thost ne $myhost) {
             $_="HOSTNAME=\"$myhost\";" ;
        }
    }
   elsif ( /^{/ ) {
         $INRULE=1 ;
    }
     elsif ( /^}/ ) {
         $INRULE=0 ;
    }
     elsif ($INRULE == 1 and ($sharp,$tpath,$cond) = /^(\s*\#?\s*)(\/\S+)\b(\s+->\s+.+)$/) {
         $ret = ($sharp =~ s/\#//g) ;
         if ($tpath eq '/sbin/e2fsadm' ) {
             $cond =~ s/;\s+(tune2fs.*)$/; \#$1/ ;
         }
          if (! -s $tpath) {
             $_ = "$sharp#$tpath$cond" if ($ret == 0) ;
         }
          else {
             $_ = "$sharp$tpath$cond" ;
         }
     }
     print "$_\n" ;
} close(POL) ;
# perl /etc/tripwire/twpolmake.pl /etc/tripwire/twpol.txt > /etc/tripwire/twpol.txt.new ← ポリシーファイル最適
# echo ! "/var/lib/tripwire/hostname.twd ;" >> /etc/tripwire/twpol.txt.new ← Tripwireデータベース自体をチェック対象外にする
# echo ! "/tmp/tripwire.log ;" >> /etc/tripwire/twpol.txt.new ← Tripwireログをチェック対象外にする※後述のTripwire定期自動実行スクリプトで使用
# twadmin -m P -c /etc/tripwire/tw.cfg -p /etc/tripwire/tw.pol -S /etc/tripwire/site.key /etc/tripwire/twpol.txt.new ← 最適化済ポリシーファイルを元にポリシーファイル(暗号署名版)作成
# twadmin -m P -c /etc/tripwire/tw.cfg -p /etc/tripwire/tw.pol -S /etc/tripwire/site.key /etc/tripwire/twpol.txt.new ← 最適化済ポリシーファイルを元にポリシーファイル(暗号署名版)作成サイトパスフレーズ
サイトパスフレーズを聞いてくるので入力するとポリシーファイルを作る。
rm -f /etc/tripwire/twpol.txt* ← ポリシーファイル(テキスト版)削除
 ※ポリシーファイル(テキスト版)を復元する場合
twadmin -m p -c /etc/tripwire/tw.cfg -p /etc/tripwire/tw.pol -S /etc/tripwire/site.key > /etc/tripwire/twpol.txt
データベース作成
# tripwire -m i -s -c /etc/tripwire/tw.cfg
ローカルパスフレーズを聞いてくるので入力、そして
Tripwire確認
# tripwire -m c -s -c /etc/tripwire/tw.cfg
結構なファイルをチェックしているので時間がかかるが、レポートが表示されればOK